dinsdag 10 november 2015

Bigtwin Bikeshow

Last weekend there was the annual Bigtwin Bikeshow in Rosmalen ( the Netherlands ). The last two years i've been a jury member so i never had the change to take a look at the rest of the show.
This year i was just a visitor so i took my time to take a good look at al the bikes and parts.
Saw some nice bikes and my mind is filled with inspiration.

Spinger inspiration.


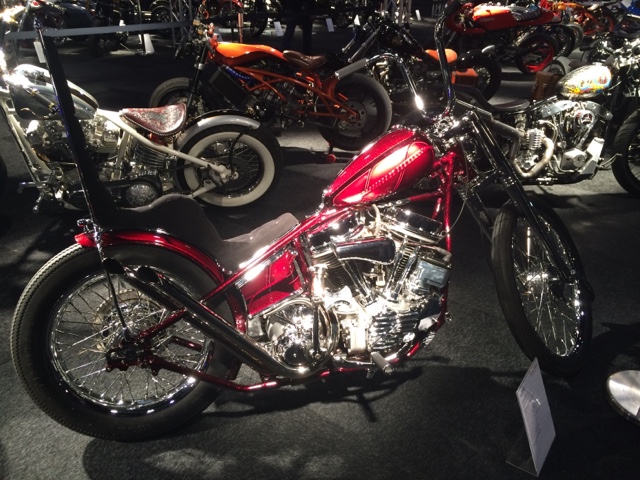
Best looking bike at the show.


Hate the bike, love the paint.


donderdag 8 oktober 2015

Projects project projects

I'm going to have a very busy winter. Made some plans to change my '80 Ironhead.
Going to change the gas tank, make a new seat, loose the front fender, rewire the bike/gastank, clean up the handle bar en to finish it off i'm going to repaint al the tins in a mild 60's style and coat the handle bar en sissybar.

Further more i'm going to finish the hardtail frame so i can start building on my hardtail project.

And last but not least i've to help my buddy to get his '03 Fatboy back on the road.

More to come?


woensdag 23 september 2015

Marker, paper, scissors

Fooling around with some cardboard to make a nice looking oil tank. Just some little fine tuning and I can start with some sheetmetal.


maandag 24 augustus 2015

A sissybar for Lucy


Made me a nice little sissybar for Lucy. Nothing fancy, just something to hold my camping gear, raincoat and tools.
Since it's a swingarm frame and i dont like the stock sissybars i had to come up with an alternative.
I made some bungs to replace the bolts that hold the fender and made some bends in 12mm steel to make a nice little sissybar.
I think the bungs alone are strong enough to hold all my gear, but maybe i have to put in some kind of reinfocement. I little roadtest will answer that. 
In the meantime i can decide what finish i will put on the sissybar, Chrome, spraypaint, powdercoat.


vrijdag 7 augustus 2015

Frame almost done

Finally had some spare time today to work on the project. 
Tag welded the axle adjusters in place today. Just a few minor things to do an then she can be welded up. 


donderdag 2 juli 2015

Evening ride

Summer has only just started and the temperature is allready sky-high. Way tot hot to work in the shed or to do some serious home improvement.
Best thing to do right now is to ride early in the morning or late at nigh to cool down a little.

Tried to make a few cool shots with my GoPro, Here's the best one from last night.


dinsdag 9 juni 2015

Cosmetic changes

Did some minor cosmetic changes on the '80 ironhead. Changed the header-wrap for some nice black and changed the rusty rocker bolts for some nice green ones to match the future paint job. 
Also started the work on the hardtail rear struts and smoothing out the gas tank.
First I have to refill some fluids to get her properly running and finish the project frame for final welding.  


woensdag 27 mei 2015

One down, seven to go.

Finishing up the frame ends. Just some details that will make the frame look a little better than the rest.
Not to myself; Next time do it before you notch your frame tubes so you wont have to file whole evening.


woensdag 20 mei 2015

zaterdag 16 mei 2015

Flanders Chopper Bash

Spent the my Saturday at Flanders chopper bash in Axel the Netherlands. Except for the shitty weather it was worth the trip. Next year I will set up my tent next to the soccer field so I can stay whole weekend. 


Best of show


My personal favorite and winner of the best Knuckle award.


zondag 10 mei 2015

Frame work done. Finally

Finally finished my frame. Now I've got to take her apart, finish up the welds and start with the next phase of assembly.


woensdag 6 mei 2015

Frame work almost done

Last two cross-members are in place an ready to be tag welded. Once their in placed the rest of the frame can be tig-welded and I can finally start building.


zondag 19 april 2015

Tank day

It aint the most beautifull tank right now. But she is getting there. Once i've straightened here out I will modify the tank mount so she can be painted. Once she's mounted I will add the speedo, electric etcetera. 


woensdag 15 april 2015

How to check your generator

In my search for information about a 12V generator i 've found several resources that gave me some information about how you should/can check your generator.
What i really missed was one simple toubleshooting guideline.
So here it is.


To check if your bike is charging the way it supposed to, you start by doing the following.
With the engine turned of you measure the current on your battery with a DC Voltmeter . It should read about 12.4 Volts.
If it's below 12 Volt you should charge your battery, refill it or replace it. Depanding on the state of the battery.


To check if the charging system is working properly and with the wires of the Voltmteter still connected, you should see a decrease on the voltmeter when you start the engine followed by a recovery to 12+ Volts once the engine is running. When you let the engine idle to about 2000 Rp, you should see an incline to 13.5/14 Volts. This indicates the charging system is working properly. If the current is above 14,5 Volts your regulator is broken and you should replace it. If the current stays the same or even drops a little it means we have to do some research. Because it/s near impossible tot check a regulator and you have probably checked the wiring, the easiest way to troubleshout is by checking the generator.


Many manuals say you should/can leave the generator on your motorcycle while testing. I on the contrary say you should  remove it and test it on your work bench.
The generator is mounted with only two bolts on the cam side and two wires on the other side. By removing it you are sure there is nothing else influencing the generator and you can be certain your test is legit.


The first test is to see if the generator turns freely. If you feel any resistance whil turning it you probably have to replace the bearings of your generator. A other possibility is that the armature is touching the field coils. This is something we will discover later on.
Next up is to turn your generator into a electric motor. With the generator on the work bench you connect a jumperwire from the F terminal to the generator case. Than connect a jumperwire from the A terminal to the + on your battery. The last wire is a jumper wire from the F terminal to the - on your battery. Once connected the generator should turn like an electric motor. If it turns smootly you know your generator works and your problem is probably a damaged regulator. The only thing we don't know is the output voltage the generator is producing. To test this you have to install the generator, connect it, polorize it and test it like your manual says. It should deliver about 35 Volts at 2000 Rpm.
If this this value is also correct you know for sure your regulator is busted.


If the generator doesn.turn try to polarize it. You can do this by connecting a jumper wire from the A terminal to the + on your battery en momentarily connect a jumperwire between te F terminal and the - on your battery..
If the it still doesn't turn try to feel, with the wires connected, if you're able to turn the armature. If it's locked into place with the wires connected and runs freely without the wires you have a shortcut in the generator and it could mean several things.


First is to check the wiring from the field coils. To do this we have to dismantle the generator by removing the bearing housing on the connector side. ( See manual ) Once removed you should see someting like this.


Now we can disconnect the wire from the fiel coils to the brushes and remove the brush mounting plate. While were the check if the brushes run freely in their casings and if they are at least 12 mm long. If they are any shorter replace them.
With this removed you can remove the housing, incl field coils, from the armature. When you now measure the resistance ( Ohm ) on the field coils you should see about 3/5 Ohm between the A and F terminal and no resitance between the casing and one of the terminals. If you see any resistance between a terminal and the casing or see no restistance between the two terminals your field coils need replacement.
If all vallues are good make sure the wire connceted to the brushes is coming from the A terminal.If so your casing/field coils are in good order.


To test the armature you need a Growler. only oldtimer freaks or old garage still have these so we need to find an alternative. By eliminating everything else we can make sure the armature is working or busted. The only check we can do without a Growler is te see if we measure resistance between the collector ( the bronze part were the brushes touch ) and the magnets between the coils. You should measure no resistance. If you do see any resistance your armature is probably broken..


Last step is to find out if the armature is touching the field coils. Best way to do this by assembling the generator completely with a small addition. Put some cardboard between the brushes and the collector or remove the brushes. The last option works best because you can test in several postions.
With the generator assembled and still on the bench we now are going to test the field coils again. If there is any resistance between one of the two terminals and the housing we have a shortcut that probably is caused by the blocks that hold the field coils touching the armature. You can file down the these blocks so the armature wont toĂșch the field coils. Make sure you clean the generator before reasembly.
 
When al of the above is correct we should now have a working generator that we can test like an electric motor again.If the generator now turns we have fixed our problem and we should have a working charging system.
Reassemble, polarize ( When connected momentarily run a jumperwire from the + terminal to the A terminal ), start engine en check if it's charging.


When you need to replace a regulator i advice to use one like show below. It's mounted directly on the generator so it will recieve maximum cooling and also has two indicator lights. Red for idle to show the system is good to go en green to see it charges when you run it at a higher Rpm


zaterdag 11 april 2015

Changed my mind

Chopped up the new handlebars i just had finished. 
The looks were great but they can even do better. Just narrowed it a few centimeters so it fits between the fork legs instead equal to the triple tree. I will weld it up tomorrow so i can finally put it on the bike. 


vrijdag 10 april 2015

Charging done right


Finally fixed my electrical problems. 
After several hours i finally found the problem why Lucy wasn't charging. 
One small copper wire was touching the case of the generator and shortened the whole charging system. 
Fixed the problem, polorised the generator and were good to go. 


maandag 16 maart 2015

Almost ready for the summer

Cleaned up the shed today. 
Workbench is now ready for some new projects. First up- finish the new handlebar, fix the dented fatbob tanks, install the tank with dash, electrical etc. 
In the mean time I hope to do some work on the project and offcourse work on the house/garden. 
It's going to be a busy summer. 

woensdag 18 februari 2015

Test fitting

Tested the new handlebar. 
Looks the way I hoped it would. 
Need to narrow it a little bit more and weld it. 
Of course it will be wrapped in cotton grip tape in the end and i will remove the small speedo/tacho unit.